Two main methods of patching a tyre, after reading, you too can learn to patch a tyre
 LienMar 05, 2025, 10:13 AM
【PCauto】In the daily operation of vehicles, tire damage resulting in air leakage is a common issue. Mastering tire repair techniques is essential—whether for handling emergencies on the spot or for understanding professional maintenance methods. Below, we detail the step-by-step procedure for repairing a tire, covering two common methods: External Tire Repair and Internal Tire Repair.
I. External Tire Repair: A Convenient Emergency Strategy
The external repair method, with its simple operation and few tool requirements, becomes a good emergency solution for sudden tire air leaks. To implement the external repair method, prepare a jack, socket wrench, tire repair rubber strips, reamer, utility knife, and tire pressure gauge in advance.
1. Preliminary Preparation and Locating the Leak
Upon noticing a tire leak, the first priority is to ensure the vehicle is safely parked. The vehicle should be stationed on a flat, open area, well away from busy roads, and engage the handbrake. At the same time, set up a warning triangle 30 to 100 meters behind the vehicle to alert oncoming traffic and avert secondary accidents. Once these safety measures are in place, carefully inspect the tire’s exterior, either visually or with simple tools, to accurately pinpoint the leak, whether it is a nail puncture or damage caused by other sharp objects.
2. Cleaning the Damage and Preparing for Repair
After locating the leak, proceed to clean the damaged area. Use the tire plug tool to meticulously remove any debris, dust, or foreign objects lodged in the puncture, ensuring that the surrounding area is pristine. This step is crucial to ensure that the repair material adheres effectively. Handle the area gently to avoid enlarging the puncture.
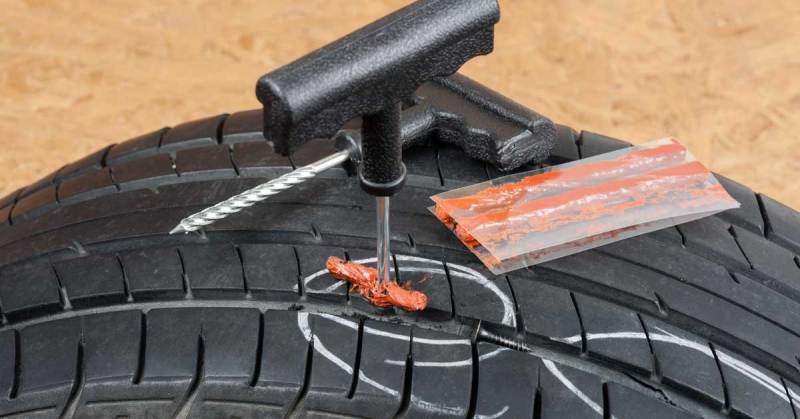
3. Inserting the Rubber Strip and Sealing the Puncture
Select a tire repair rubber strip that fits the size of the wound and thread it through the hole at the front end of the reamer. Holding the reamer, align it with the air leak wound on the outside of the tire, apply force to pierce the tire with the reamer and the rubber strip, until it penetrates to the inside of the tire. Then slowly pull out the reamer, leaving the rubber strip inside the wound. With the filling and sealing performance of the rubber strip, the initial sealing of the air leak wound is achieved.
4. Trimming the Excess Rubber Strip
After inserting the rubber strip, some excess material may remain on the tire’s surface. Use a box cutter along the sidewall of the tire to carefully trim away any surplus, ensuring that the remaining patch material is flush with the tire's surface. This precaution prevents the excess from coming loose during driving due to air flow or road vibrations, thereby averting new safety hazards.
5. Pressure Check and Restoration
Connect a tire pressure gauge to the tire’s valve stem to accurately measure the current pressure. Then, using an air pump, add the necessary air until the tire pressure reaches the manufacturer’s recommended value. Maintaining the proper pressure is key to ensuring vehicle stability and prolonging the tire’s lifespan.
6. On-Road Testing
After completing the repair and adjusting the pressure, cautiously start the vehicle and drive at a low, steady speed along a predetermined route. During the drive, closely monitor the vehicle’s behavior, watch for any abnormal vibrations or noises from the tire area, and check that the steering remains responsive. Once finished, stop and recheck the tire pressure to verify that the repair is secure and that there is no recurring air leak. At this point, the external repair process is successfully complete.
II. Internal Tire Repair: A Professional and Long-Lasting Solution
In contrast to the external method, internal tire repair offers a higher level of precision and durability. Widely employed by professional tire repair shops, this method requires specialized equipment such as a tire bead breaker, a grinding machine, and a curing press, making it a more technically demanding process.
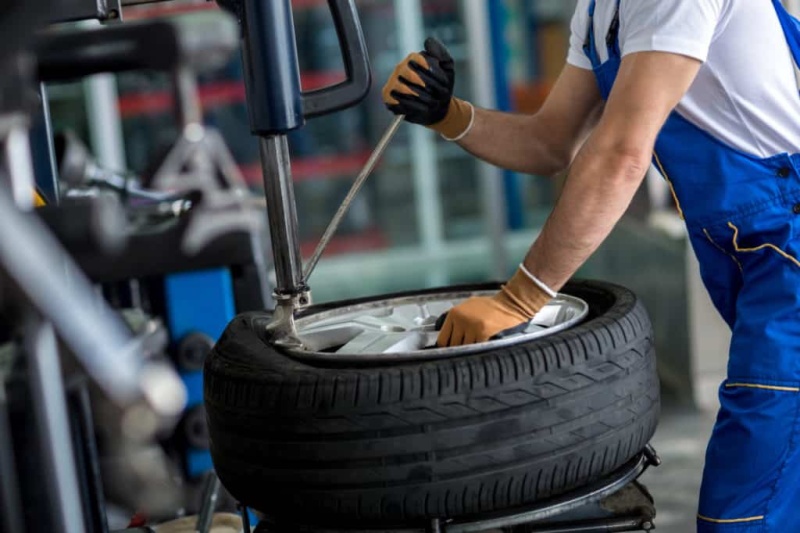
1. Preliminary Tire Removal
The internal repair process begins with the removal of the tire. Loosen the lug nuts using a socket wrench, then gradually elevate the vehicle with a jack until the tire is off the ground. Remove all lug nuts and, with careful coordination, remove the tire from the wheel. Place the tire in a secure area that is convenient for further operations.
2. Separating the Tire from the Rim
Place the removed tire on the workbench of a tire bead breaker. Following the machine's proper operating procedures, initiate the bead-breaking process, with manual fine-tuning if necessary, to gradually separate the tire from the rim. This step requires skilled handling to avoid causing any structural damage to either the tire or the rim, thereby ensuring that both remain intact.
3. Inspecting the Internal Damage
Once the tire is separated from the rim, flip it so that the inner side is facing up. Under ample lighting, perform a thorough inspection of the tire’s interior. Accurately identify the damage, measure the puncture's size, and assess its shape to collect precise information for formulating an effective repair plan.
4. Sanding the Damaged Area
Based on the inspection, use a grinding machine to sand the area surrounding the puncture. Ensure that the grinder is applied evenly to create a rough texture on the tire’s rubber surface. This sanding process increases the contact area between the repair patch and the tire, laying a strong foundation for a durable bond.
5. Applying the Repair Patch and Vulcanization
Choose an appropriately sized repair patch based on the puncture’s dimensions. Gently peel off the protective backing from the patch and align it carefully over the sanded area, ensuring there is no wrinkles. Next, place the tire in a curing press set according to the manufacturer’s specifications and initiate the operation. Under high temperature and pressure, the patch fuses with the tire rubber, forming a repair that offers superior strength and sealing capabilities.
6. Reassembling the Tire and Adjustments
Once the vulcanization process is complete, begin reassembling the tire. Mount the repaired tire back onto the rim, ensuring it is seated precisely and fits securely. After fastening the tire on the vehicle with a socket wrench, tightening the lug nuts to the standard torque specifications, recheck the tire pressure using a gauge and add air as needed. Additionally, to guarantee a smooth ride and prevent issues such as vibrations or abnormal steering feedback due to an unbalanced tire, utilize a professional wheel-balancing machine and apply balance weights based on the test results.
7. On-Road Testing
After all the above steps are completed, take the vehicle for a road test. Choose a route that includes diverse road conditions such as straight stretches, curves, and rough surfaces, and drive at varying speeds to fully assess the vehicle’s performance. Upon finishing, stop to recheck the tire pressure and inspect its overall condition to ensure that the repair is perfect and that the vehicle’s driving dynamics have returned to normal. At this point, the internal repair process has been successfully finalized.
Whether using the external or internal repair method, it is crucial for the owner to continuously monitor the tire’s condition after repair. Should any abnormalities such as unexpected changes in air pressure, unusual noises, or vibrations occur while driving, the vehicle should be immediately inspected. If necessary, reapply the repair or replace the tire to ensure driving safety.
If any infringement occurs, please contact us for deletion
Trending News

The all-new Lexus ES announces pre-sale on March 20: Say goodbye to pure gasoline engines and launch a pure electric version
Lexus's bestseller sedan, the ES, ushers in a major overhaul, officially confirmed to start pre-sales on March 20. The new car has not only undergone significant size extensions based on the GA-K platform but has also made a complete transformation in its powertrain logic — abandoning purely fuel-powered engines in favor of the ES 300h hybrid and the brand-new ES 350e/500e fully electric versions, officially joining the luxury electric sedan market competition.

The Lexus ES 200: Laughed Out of Existence
With the official debut of the eighth-generation Lexus ES in the global market, we quickly realized that the once entry-level model ES 200 has completely disappeared. Now only the ES 350h, ES 350e, and ES 500e remain, and for this reason, the Lexus ES 200 was launched with a two-tone body in the Chinese market as a commemorative edition.

Toyota recalls over 3 million vehicles worldwide, including Camry, Land Cruiser, and Lexus
According to the latest news, Toyota has officially launched a large-scale global recall involving approximately 3.3 million vehicles due to a defect in the reverse assist system software, which may cause the screen to freeze at critical moments.

Before buying the Chery Omoda 5, you must know some issues
Chery Omoda 5, as a key model for the Chinese brand Chery to enter Malaysia's B-Segment SUV market, has attracted considerable attention since its launch with its impressive features, enticing warranty policies, and market promotions. However, despite the hype, various issues reported by real owners are gradually emerging.

Toyota Land Cruiser FJ confirmed to launch in Thailand on March 21, expected to start from RM137k
For those obsessed with the rugged DNA of the Land Cruiser but deterred by the high price tags of the 300 Series or 250 Series, this compact off-road vehicle built on the IMV 0 platform is undoubtedly the most anticipated surprise of the year.

Popular Cars
Model Year
Car Compare
Car Photo